Wednesday, April 30, 2014

Trim & Highlight Please!

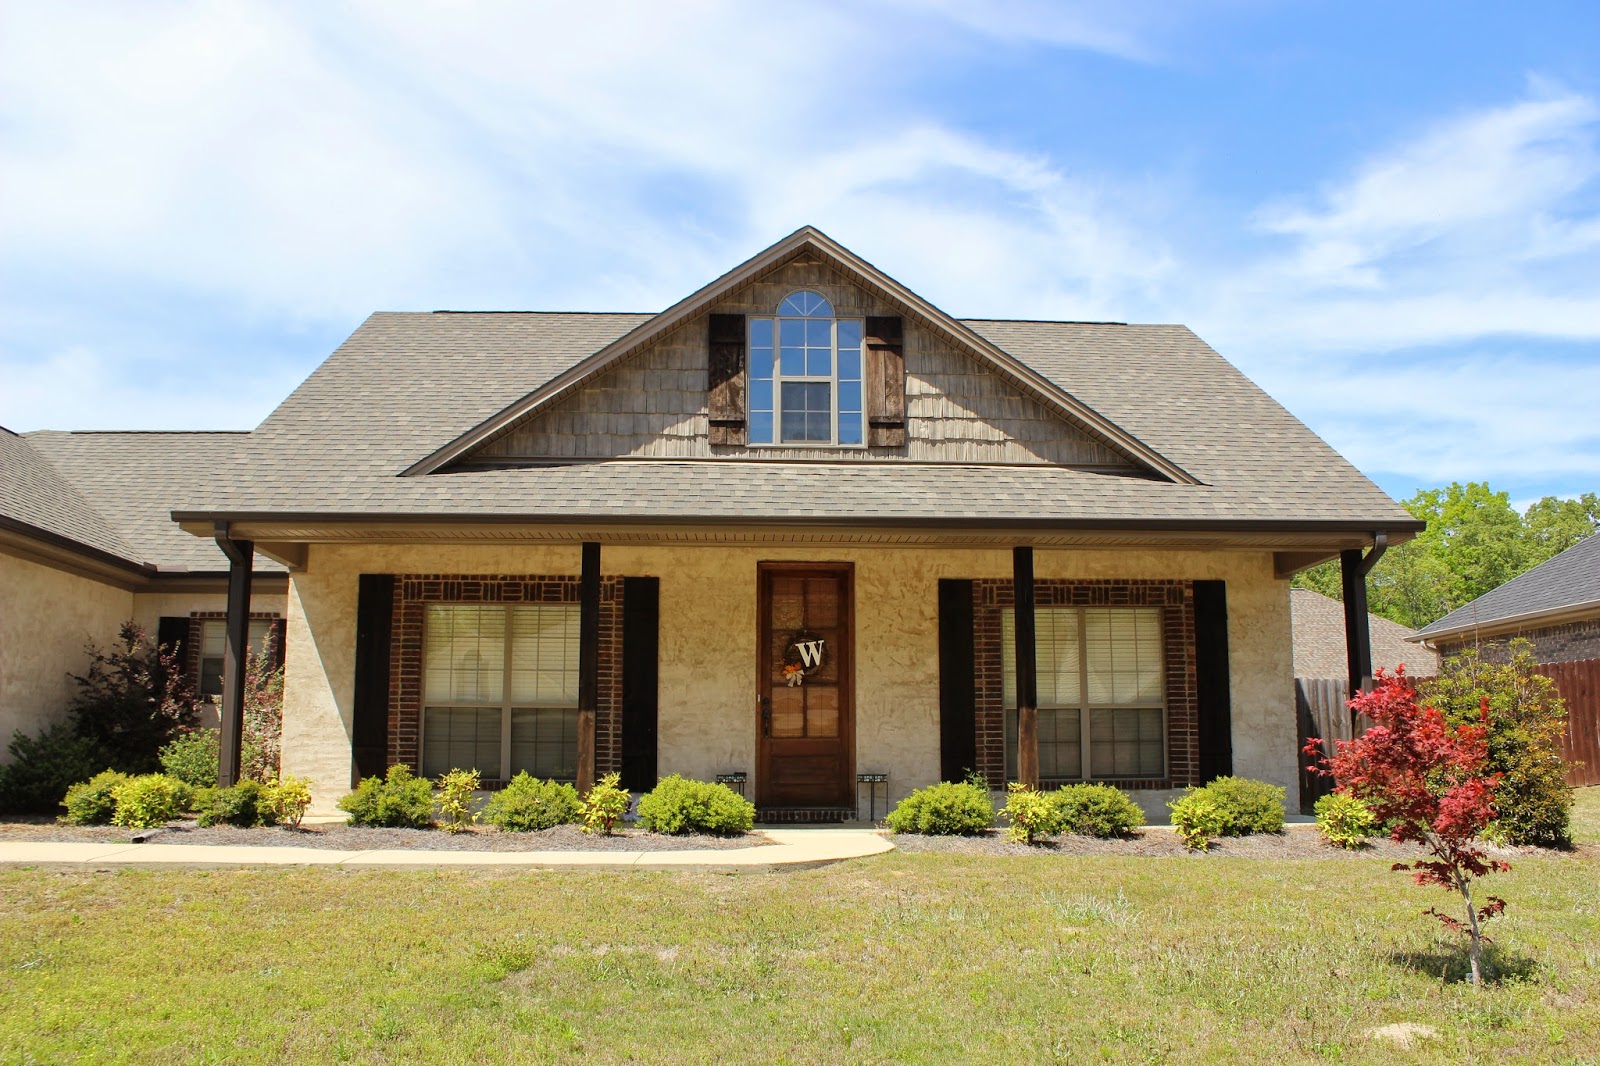
The first thing we decided to tackle in the front yard was to replace the pine straw and shape the bushes.  We checked out several other yards in the neighborhood.  There was a pretty good mix of things:  pine straw, rocks, and black, brown, and red mulch.  Our favorite was the brown mulch.  We thought it would match really well with the dark brown posts and shutters on the house.

So off to Lowes we went!

We picked out Scotts Nature Advanced Scapes Deep Forest Brown Bark Mulch.

Each bag should cover 12 sq. ft.  I guessed we'd need about 4 bags.  Drew disagreed.  He thought we'd need more like 12 bags.  We decided to go with 6, since they were on sale 3 for $12.

After we got home, Drew started mowing while I went to work removing the pine straw.  At first I was picking up bunches and putting them in trash bags.  It was taking too long, so I started just throwing it in piles on the porch.


Drew was having lawn mower drama and had to run back to Lowes to exchange it.  When he got back and noticed the huge piles of straw, he started seriously doubting my decision to go with fewer bags of mulch.

We kept pressing on.  After I had it all piled up, I used a small rake to level the ground and gather any pieces of straw that were left behind.  We used these smaller piles to fill in any holes in the beds.

Then we started to spread out the mulch.  Drew slit the top of each bag open with a box cutter and dumped small piles throughout the beds.  Using the rake again, I spread the mulch out, leaving it a couple inches thick.

After we got going, we quickly realized that Drew was right.  Yep, I said it.  Drew was right.  We needed way more than six bags.  Drew refused to go back to Lowes, so I went this time.  I got nine more bags and picked up some hedge trimmers.

Luckily that was enough to finish the beds.  While Drew finished spreading out the last of it, I started trimming the bushes.  Note to self:  Trim the bushes before laying down mulch.  We had all kinds of little  green leaves on that pretty brown mulch.  Bummer.


And guess what, when I was trimming the bushes, we found a few plants we didn't even know were out there.  Seriously.


No, the plants aren't perfect.  I could probably do some more trimming, but I was scared to take too much off.

Ok, ready to see the difference?

(I'm sorry about the not-so-bright photos.  The weather is really yucky today and is supposed to be that way for a few more days.)

Looks great, right?  The dark color of the mulch just looks so rich and really makes the plants pop.  Definitely a transformation.

Two things off the to do list!
  • Weed & Feed the grass
  • Remove the pine straw and replace with mulch
  • Reshape the plants
  • Treat (or replace) the bushes flanking the garage
  • Add edging stone around the beds
  • Remove the two trees in the front? (I'm not a huge fan of their current placement.  If we remove them, we'll replant them in the backyard.)
  • Kill and remove all ant beds
  • Re-stain the posts and shutters
  • Add furniture, flowers, and accessories to the porch
  • Spice up the beds (Our neighbor has solar lights and potted plants in her's, and it looks really cute.)
  • Pressure wash the driveway, curb, sidewalk, house, and front porch
  • Add house numbers 
  • Add some pizzazz to the garage door
  • Add lanterns on either side of the front door to match the garage
  • Address an issue with one gutter drain directing water under the sidewalk 
  • Add solar lights around the driveway, in beds
Now we just need to deal with the garbage situation in our garage.  Garbage day is still 5 days away.  Eek.


Monday, April 28, 2014

Front Yard To Do List

Since it's finally starting to warm up, we're moving our attention outside.  Let's take a look at what we're working with in the front yard.


Doesn't look so bad, right?  Already landscaped.  Nice colors.  Well kept.

Let's look closer.


Overgrown plants.  Unkempt pine straw.  No furniture.  Lawn has too many weeds.  Ant beds invading flower beds.  And I'm not sure if the bushes on either side of the garage are dead or alive.

No, it's nothing awful, but we're not going to be winning a "Yard of Year" award anytime soon.  And since several of the yards in the neighborhood are really nice, we have to at least try to compete.  

Here's the list of everything we're looking to tackle:
  • Weed & Feed the grass
  • Remove the pine straw and replace with mulch
  • Reshape the plants
  • Treat (or replace) the bushes flanking the garage
  • Add edging stone around the beds
  • Remove the two trees in the front? (I'm not a huge fan of their current placement.  If we remove them, we'll replant them in the backyard.)
  • Kill and remove all ant beds
  • Re-stain the posts and shutters
  • Add furniture, flowers, and accessories to the porch
  • Spice up the beds (Our neighbor has solar lights and potted plants in her's, and it looks really cute.)
  • Pressure wash the driveway, curb, sidewalk, house, and front porch
  • Add house numbers 
  • Add some pizzazz to the garage door
  • Add lanterns on either side of the front door to match the garage
  • Address an issue with one gutter drain directing water under the sidewalk 
  • Add solar lights around the driveway, in beds
This list is definitely subject to change, but it's everything we're currently looking at.  I'll keep you updated on all the progress!

Friday, April 18, 2014

Replacing the Bathroom Mirror

When we moved into the house, we made a very plain, very builder-basic mirror.


Unfortunately, I don't seem to have gotten a good picture of the mirror before.  I did find a picture from when we bought the house though (from when the previous owners lived here).


See, very basic, pretty boring.


Our mirror was attached with these little clips.  Drew slid a putty knife under one of the hooks and lifted it by gently tapping the bottom with a hammer.


After he got one up, I held it in place while he repeated the process on the other side.  Once the mirror were free from the upper clips, we pulled it forward and up, lifting it out of the bottom clips.  

Since it was a two person process, there are no pictures of this.  Can you teach dogs to take pictures?

Also, note that our mirror was not attached to the wall with any kind of glue.  I imagine that would have made the process more difficult.

These are the clips that were holding the mirror in.

There's a screw in the center.  We unscrewed the clips from the wall and were left with what looked like sheet rock anchors.  The tops ones we just left, since they would be hidden by the new mirror.  The bottom ones we covered using a sheet rock repair kit.

Next was the task of hanging new hardware for the mirror.  It had metal hooks on the back, so we used these picture hanging hooks to attach the mirror.


To get the placement correct, Drew held the mirror in place.  I made a pencil mark along each side and one each end at the top.  We measured how far it was from the top of the mirror to the hook, and duplicated this measurement from the top line down.  We did the same thing on each side.  We made our pencil marks, used a level to make sure we were even, and nailed in the hooks.  With each of us holding the mirror, we hung it carefully on the wall.  Ready for the finished looked?


Looks pretty good, huh?  (That snazzy new vanity top and faucet don't hurt either, do they?)  Needless to say, I'm loving how this bathroom is turning out!


Wednesday, April 16, 2014

Chicken & Cheese Quesadillas

Whenever we're looking for a quick meal, I like to whip up these chicken and cheese quesadillas.  They're super easy.

Chicken and Cheese Quesadillas


Ingredients:
Taco seasoning
Diced chicken breasts
Shredded cheddar cheese
Flour tortilla shells

Optional:
Taco sauce
Sour cream
Salsa

Directions:
Thoroughly cook diced chicken breasts in a skillet.  (I like to add a little bit of butter).  Add taco seasoning.  Move the skillet to the side.  In a clean plan, warm tortilla shells on both sides.  Top with cheddar cheese and diced chicken.  Fold the tortilla over and cook on both sides until cheese is melted.  Flip often to keep the shell from burning.

I eat mine with sour cream and salsa.  Drew likes his with taco sauce.


Monday, April 14, 2014

Out With the Old...

There wasn't anything wrong with our old vanity top.  I just didn't really care for it.  The white seemed stark next to all the dark wood.  The dip along the sink rim took up valuable space.  And since we had already burned the matching top in our bathroom, I knew this thing would never survive.


Before ripping the old one out, we started searching for a replacement.  The old top measured 30.5" by 22", so I began by filtering for this size on the Lowes website.  That must be an odd size because there were only a few available; however, there were several options at 31" by 22".  While we seriously considering going with a black vanity top (like we had seen in another house we looked at), we decided a to go with a beige color.  Ready to see it?


It's a quartz top with under-mount sink from Allen + Roth.  We thought the beige tone would work fantastically with the existing cabinet.

The faucet needed to have an 8" spread, so we couldn't get our first choice.  We found one we liked, but wanted to price-match at Home Depot.  It's a good thing we did because we found a similar one for $60 cheaper!  This one is made by Pfister and is called Pasadena.


We also picked up some clear silicone caulk and plumber's putty while we were out.  Now that we had our supplies, we could get to work.

 The first step was to turn off the water and disconnect the lines.  After turning the water off, turn the faucet handles to relieve the pressure.


Next you need to remove the p-trap.  Don't forget to have a bucket ready to catch the water!


Having a helper is always a good idea!


After we were finished under the sink, we started separating the top and side splash.  I could see some space between the vanity top and vanity, so I assumed it wasn't connected to the vanity.  The side splash however, was meant to stay attached to that wall forever.

We started by running a razor blade through all of the caulk.


Drew then took a putty knife and hammer to fully severe the caulk.  He placed one corner of the putty knife into the caulk between the side splash and the vanity and tapped in with a hammer to wedge it in.  Once we got started, he could slide it down.


He repeated the process to separate the side splash from the wall...


...but there was an awful secret lurking behind the side splash.


The builder had used huge globs of construction adhesive to secure it to the wall.  If we planned on keeping it, I'm sure we'd be happy that it could survive a tsunami.  Since we didn't want to put up a new side splash, we used our drywall patching kit to even things back out.  I'll be honest; it's not perfect.  But if it starts to bother me, I'll just throw up a side splash.

We repeated the process on the back splash, but since it was actually attached to the vanity top, it was much easier to deal with.  And I was right, the vanity top was not glued to the vanity.  So we just lifted it up and moved it to the guest room until we can resell it.  (Hey, by the way, we have a vanity for sale if you're in the market.  But seriously...)

Compared to putting in the new vanity top, this part was a breeze!  Have you every replaced a vanity top?  What about the whole vanity?  How did it go?  Any tips for how we could make things go smoother next time?

Friday, April 11, 2014

Repainting the Bathroom

I'm sure everyone still has the image of that yellow bathroom seared into their brains, but in case you've forgotten, let me remind you.


As soon as we put it on the walls, we knew we needed to try something else.  So we took another look at the colors in the curtain:  beige (the walls were originally this color), yellow (not so pretty), red (could this end up being really dark?), dark minty green (again, too dark?) and light minty green (ding, ding, ding, we have a winner!).

So back to Lowe's we went.  After talking to the lady at the paint counter, she said we would need a separate paint and primer.  We requested Valspar paint and primer.  The paint color we picked out was called Minty Fresh.


After adding the primer, our eyes could focus a little easier in the room.  We could instantly tell how much better everything looked without the yellow paint.


Before painting the entire room minty green, we paint a small section of the wall.  We were super skeptical.  I think I especially was really nervous about painting the entire room again and not liking it.  We painted a little bit bigger section and let it dry.  It looked really good.  So we took the plunge and painted the entire room.


Like you can see from the pictures, sometime the paint looks more green, sometimes in looks more blue.  The color-changing doesn't both us.  We love it!  At first we were worried it might not match the curtain after all, but once we hung it, we were in love!

Wednesday, April 9, 2014

Chicken Parmesan Baked Pasta

I found this little gem on Pinterest.  I made a few adjustments to the original recipe based on what I had one hand. I thought it was a nice alternative to traditional chicken parm, and pretty tasty!

Chicken Parmesan Baked Pasta


Ingredients:
cooked diced chicken
penne pasta
1 can of diced tomatoes
1/2 can of chicken broth
1/4 teaspoon of oregano
1/8 teaspoon of red pepper flakes
2 tablespoons of basil
1 teaspoon of minced garlic
1 tablespoon of oil
1 cup of shredded Parmesan
1 cup of shredded mozzarella
2 cups of water

Directions:
Preheat over to 425 degrees.  Add oil to a hot skillet, followed by garlic, oregano, red pepper flakes, and basil.  Cook for about 1 minute, continuously stirring.  Add tomatoes, chicken broth, water, and uncooked pasta to the pan.  Bring to a boil, then decrease temperature.  Cover the pan and let it simmer until the pasta is cooked (about 15 minutes).  After the pasta is cooked, remove the pan from heat.  Add in 1/2 cup of Parmesan and mozzarella cheese and cooked chicken.  Transfer this to a baking dish and top with the remaining cheese.  Pop the dish into the oven for about 15 minutes, or until the cheese is melted.


Monday, April 7, 2014

Things Don't Always Work Out

In the before pictures of the guest bathroom, you saw this awesome shower curtain we bought at Bed, Bath, and Beyond.


So when it came time to pick out a paint color for this room, we knew we wanted to pull from that curtain.  Drew did some rough mock-ups in photoshop, and we decided yellow would look awesome in the space.

So we picked out a color swatch, grabbed a gallon of paint, and got started.


The results were...bright.


Like highlighter yellow bright.


Needless to say, sometimes things don't always turn out like you thought they would.


Friday, April 4, 2014

Homemade Taco Seasoning

So I'm getting ready to make enchiladas and realize, "Crap, I forgot to buy taco seasoning."  I start trying to decide if I can talk Drew into stopping for some on his way home from work so I don't have to.  Then I remember, "Didn't I pin a taco seasoning recipe a few months ago??"  I grab my phone and search for the pin.  Found it!  I scan the ingredients and check my spice drawer.  Yep, I have everything!  I whipped up a small batch and used it.  Guess what?  It was fantastic!  I've used this recipe in with beef (enchiladas) and chicken (quesadillas).  I think it has great flavor and tastes way better than any of the little packets  you buy at the store.  Plus, since I already had everything on hand, it seemed like I was getting seasoning for free!

Ingredients:
1 part chili powder
1 part onion powder
1 part cumin powder
1 part garlic powder
1/4 part red pepper flakes


My "parts" were teaspoons.  When I mixed my batch, I alternated 1 teaspoon of each ingredient (and 1/4 teaspoon of red pepper) until the jar was full.


It's like those jars of colored sand you buy a beach souvenir shops, except with spices.


Next just screw the lid back on and shake it up!


When cooking, I usually use 1-2 teaspoons of the mixture, depending on how much food I'm seasoning.