Wednesday, January 29, 2014

Baked Penne


This is a simple recipe that's all over Pinterest.  I think most people call it "two-timing pasta," but that name doesn't really make sense to me.  Around here we call it baked penne, and we eat it often!  It reminds me of the baked ziti dish at Olive Garden.  The pasta has a lot of cheese it in, but the tomato sauce balances it out.  It's a heavy dish, but a favorite at our house.

This is a great dish for feeding crowds, but usually it's just Drew and me.  Sometimes I make a full batch of this, and separate it into 3 aluminum baking tins to freeze.  Other times I will make only half the batch.  We'll eat the leftovers the next day.  I'll use the other half of the tomato sauce for spaghetti or chicken parm and the other half of the Alfredo sauce for chicken Alfredo.  Both are great options for extending your groceries.

Effort Level:  Medium
Prep Time:  30 minutes
Cook Time:  30 minutes
Serving Size:  10 generous servings

Ingredients:
1 box penne noodles
1 jar tomato-based sauce (I use Bertolli Five Cheese Sauce)
1 jar Alfredo sauce (I use Bertolli Garlic Alfredo Sauce)
3-4 cups of shredded mozzarella cheese
1-2 cups of shredded Parmesan cheese
*On this recipe especially, I just eye-ball everything.  Depending on how cheesy you want your dish, add more or less cheese.

Cooking Instructions:
Preheat oven to 350°F.  Cook penne noodles on stove top until al dente.  In a large mixing bowl, stir together other ingredients.  When pasta is finished cooking, drain and stir in sauce mixture.  Transfer mixture to a baking dish.  Bake about 30 minutes or until cheese is melted.


Monday, January 20, 2014

Organizing Your Files In Binders


After I got married, the amount of paperwork in my life started to doubled.  Marriage license.  Tax returns.  Car titles.  Then we bought a house and the paperwork grew even more.  House deed.  Mortgage loan information.  And then there's that drawer full of owner's manuals to every appliance we've ever purchased or received as a gift.

I originally had everything split into file folders and placed in one of those large plastic milk crates, but the soon proved to be a poor choice.  The folders would fall over, we'd get new paperwork and throw it on top.  Then we couldn't find anything when we needed it.  It was a huge mess.

After I graduated college I had two large binders leftover that I just couldn't bear to get rid of.  I was determined to find a way to reuse them.  Light bulb moment.  Since the binders had done a good job of keeping my school work organized, they should be a good place to store all my files, right?

I started with my huge mess of papers and began sorting through everything.  Drew helped and soon we were able to purge anything we didn't need.  I'm kind of a hoarder, so it helped to have him saying, "No, we do not need insert useless piece of junk here."

After we purged unnecessary files, I sorted them into categories that made sense to me.  My categories were:

  • Dexter & Daphne
    • vet papers
  • Important Documents
    • Drew
      • Social security cards, birth certificates 
    • Nichole
      • Social security cards, birth certificates, name change documents
    • Marriage
      • marriage license
  • Football tickets
    • Ole Miss Athletics Foundation membership info
  • Drew's Card
    • Title
    • Insurance Policy
  • My Car
    • Insurance
    • Financing Info
    • Sirius XM Radio info
  • My Job
    • Offer letter, Contract
    • Benefits Enrollment Info & Spare Cards
    • Medical, Prescription, and Vision Insurance info
    • Plan Description
    • Retirement
    • Life & AD&D Info
  • Drew's Job
    • Similar Categories to Above
Everything was added to the binder like this:
  • file folder
    • heavy weight sheet protector
      • details on what is inside the sheet protector
Maybe some pictures will help it make sense.

 The first bullet is written on a file folder.  The file folder is hole-punched and added to the binder.


Anything falling under the "Important Documents" bullet, are placed into sheet protectors and placed after the file folder.  I just used a sticky Avery label and a sharpie to label the sheet protectors.

All of those user manuals you have stuffed in a drawer, those are in a different binder.  I chose not to go with labels on the sheet protectors in this binder since it's pretty obvious what's in them.


I ended up purchasing two more binders, since the blue one was getting full.  In one of the new binders I have all of our tax returns.  Each year is placed in a sheet protectors with a date label on the front.  The other binder houses all of the paperwork for our house.  Again, everything is separated into sheet protectors and labels placed on the front letting you know what's inside.

Now that I've been living with this system for a while what do I think?

I love it!

When I need to locate something, I know exactly which binder to go through.  It's easy to flip to the correct "folder" and the flip through the folder to see what "sheet protector" I need.  The labels make it easy to quickly see what's inside.

Anytime something new comes in that needs to be filed, all I have to do is grab a sheet protector and a label and add in to the correct folder.

How do you file your paperwork?  Have you tried the binder organization system?  If so, what did you think?  I'd love to hear about it!  Leave a comment below.  

Sunday, January 19, 2014

Christmas Storage Solutions


Our Christmas things have outgrown the storage container we've been using for the past years.  Don't believe me?  Take a look. 


 Kind of ridiculous, huh?  My first step was to get everything out of the box and start sorting through it.


 We had been keeping all of our shatterproof ornaments in their original packaging.  It wasn't really practical and was super bulky.  Plus, I hated popping them in and out of that plastic.  I decided to put them into zipper Ziploc bags instead.  This eliminates the bulky packaging and since the bags don't have a hard shape, I can back them away easier.


I also made labels for each bag.  Obviously, with the bags being clear, I don't need to read them the labels to know what's in each one.  Instead, the labels will be used to pack everything back up next year.


To make the labels, I used some Avery labels that I already had.  I downloaded the template from the Avery website into Microsoft Word.  The Christmas lights I found by Googling "Christmas borders."  I copied this one, resized it, and pasted it onto each label.  I used word art to add text.

Next, I needed new containers.  I picked up two 21-gallon Rubbermaid containers in Christmas colors from Walmart.  The red and green will allow Drew to quickly pick out the Christmas decorations in the attic.

In one container, I put all of my our tree decorations:  ornaments, toppers, and mesh.  In the other, I put everything else:  lights and things we set out.  The latter has plenty of room to add more stuff in the future.

I also grabbed an ornament storage box.  I only put our keepsake ornaments in this.  I can separate everything, so nothing will move around and get broken.


I went back later and added labels to the outside of each of the bins.  Drew's excited about how much smaller these bins are, which will make it easier to get them in and out of the attic.  I'm excited about how much more organized this system is and how everything is protected.  And did I mention I threw away three, three!, bags of trash.

How do you store your Christmas decorations?  Any tips to share?  Let us know below in the comments!

My Experience Changing My Name


Changing your name can be a daunting task.  I've changed my name twice.  I changed my last name when I got married and my first name in 2013.  I hope that sharing my experience will help you get through the process painlessly.

If you're changing your last name due to marriage, all you need is your marriage license.  If you desire to change your first name, you'll have to get an attorney involved.  I went to my attorney's office and signed some paperwork requesting my name be changed.  She took it before a judge, who approved the change.  Drew had to sign something too, acknowledging that I was changing my name.  About a week later, I was mailed the paperwork.

First Things First
Take your marriage license or court paperwork to the Social Security Office.  Both times I met with a representative who asked me some basic questions as I applied for new cards in my new name.  It took a couple of weeks for my new card to come in.

Then I went to the DMV  to get a new driver's license.  I showed them my marriage license/court papers and the piece of paper I got from the SS Office.

Make A List
Make a list of every company you need to change your name with.  Be specific.  Don't just say "credit cards."  Write out each account specifically, and mark through each item as you complete it.  Here's a sample of my list, as well as the procedure for changing your name with each.

Even though I said earlier to be specific, I've generalized my list to be able to share it with you.

  • House Deed and Loan - If you already own a home, you'll need to file a quitclaim deed to change your name on both your deed and loan.  File it at the local courthouse and send a copy to your loan officer.  (I'm still in the process of doing this myself, so I'll edit based on how things go!)
  • Bank Accounts - I just went to each bank, told them I needed to change my name on my account, and signed some paperwork.  Just make sure to take anyone with you who is also on the account.  Since I'm on my parents' account and my mom was on my account, they both had to sign paperwork to, acknowledging the change.  
  • Credit Cards - My accounts were already under my preferred first name, so I only had to change my last name.  For one account, I was able to change it online, by selecting I needed a name change after marriage. For the other, I called customer service and told them I had gotten married and needed to change the name on my account.  I received new cards in about a week.
  • Employer - To change my  name with my employer, HR made a copy of my new social security card and made all the necessary changes.  I also made a call to IT so they could transfer my username and email address.
  • Benefits - I checked each company's website for procedures to change your name.  For some, I could easily make the change online.  For others, I had to fill our a form and send in a copy of my new social security card.
  • Travel Accounts - On my Delta Sky Miles account, I had to fax a letter requesting the name be changed, along with my Sky Miles Number and a copy of my social security card.  On my Avis account, I can't remember if I changed in online or called, or both.  For my account with the travel agency, I could easily change my name on my online profile.  (I travel a lot for work, so these changes were necessary.)
  • Magazines & Social Media Sites - Trivial?  Yes.  But seeing my new name on these things made me smile.  Just log onto each account and change it on your profile.  Pretty easy.
A few other places you should considers are:
  • Vehicle Title and Loan
  • Other Insurances:  car, home, etc.
I suggest carrying around your marriage license/court papers and new social security for a little while.  This way you'll have the necessary documentation if an occasion arises.

I am by no means an expert on this topic.  I just wished to share my experience with making changes on various accounts.  I wish you the best of luck!

What experiences have you had with changing your name?  Is there something I left off of this list that should be added?  Tell me all about it below, in the comments section!

Blog Series to Look Forward To

I've been brainstorming several topics for future posts!  Be on the look out for:

  • Living with Less - We all have extra stuff.  I'm on a mission to go through our things and decide what we can live with and without.
  • Every Effort Level Meals - I'll share my favorites recipes and meal ideas for different effort levels, from zero-effort to a-lot-of-effort
  • Travel - Read how we plan trips, our travel tips, and our vacation experiences.
  • Organizing - An organized life is a happy life!  I'll share how I keep my home and life organized.
  • Project 140 - Journey with us as we make our builder's basic home our own and learn our lessons as first-time homeowners.
My goal is to post at least three times a week, but this schedule could be altered due to different circumstances.

I'd love your feedback on my posts and any requests you have for future posts!

Friday, January 10, 2014

January's Project Phase 1: Painting the Man Cave

As you remember from this post, our January Project is to makeover Drew's Man Cave.  Our first step was to clean that room out and paint it.

We went with an Vintage Gray, a color from the Eddie Baur Valspar Signature Collection.  After talking to the guy at Lowe's we decided to go with an eggshell finish.  We also picked up a painting kit from Wooster.  It had a tray, 2 roller covers, a roller, and a 2" angled brush.  To finish out our shopping list, we got a roller extension pole, plastic drop cloths, Frog tape, a paint can opener, and paint sticks.

Now let's get to work!

First we cleared out the room, with the exception of the loveseat.  (We purchased the loveseat from the Corinthian Clearance Center in Corinth, MS a few months ago.  We put it together in that room, and we weren't sure we'd get it out.)

We turned the loveseat to give us more space.  The puppies quite enjoyed the extra space to play.
Then we covered the carpet with plastic drop cloths and used some blue painters tape to make sure it stayed at the edges.  No lie, it kind of felt like we were preparing a kill room just like Dexter.  

We used the Frog Tape to tape off the baseboards, around the doors, and around the windows.  I also added a strip on top of the outlets and light swtiches after taking the faceplates off.


Then we got to painting!  Unfortunately I didn't get any pictures of us in the process of painting, but here's the skinny.  I "cut-in" around all of the trim and ceiling.  Drew followed behind with the roller.  We did two coats, letting the paint dry about 2 hours in between coats.  We used our break to go get some frozen custard from Bop's!

If you're new to painting, like we are, I definitely recommend using the Frog tape to tape off all the edges.  It allowed me to go much quicker without worrying about making a mess.  When we took the tape off, there were only a couple of spots where the paint bled.  Upon closer inspection, you could see the error was from us not pressing the tape all the way down.  Oops.

We chose not to tape off the ceiling and free-handed it instead.  After we get all of the rooms painted, we're going to put crown molding up.  It should cover any inconsistencies at the top of the wall.  (We're also planning to repaint trim when we put up crown molding so that everything matches.  This will cover up any drips we have when painting.)  My lines were a little wavy, but good for the most part.  We kept a wet rag on hand to wipe off anytime we hit the ceiling or a door, which happened more than we want to admit.

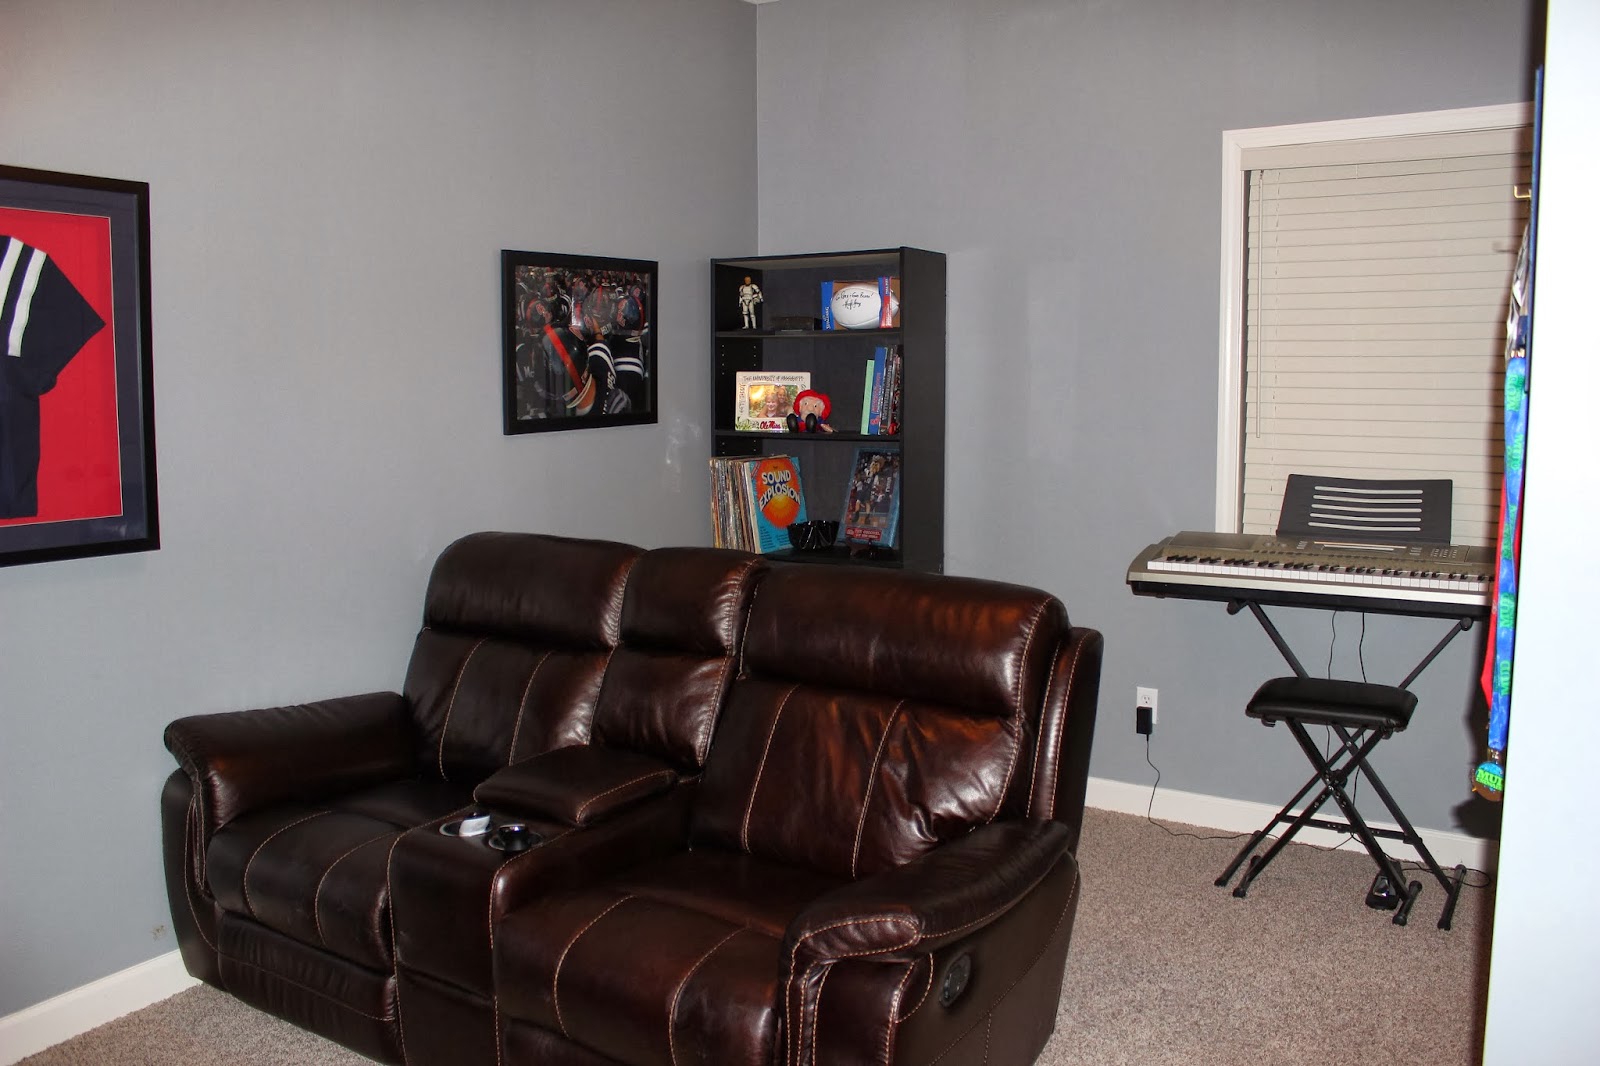
Okay, ready for the big revel?


Doesn't it look great?!  Drew said the blue-gray color looks a lot like the color of the Ole Miss football players' pants.  He keeps joking about calling Michael Thompson from the Athletics Department to verify the color.  Apparently the guy has a thing for making sure all Ole Miss colors are exactly right.  (That's Harvard Crimson and Yale Blue, in case you were wondering.)

You're probably spying that new entertainment center, awesome pictures hanging up, and the furniture rearrangement.  And where did all those DVDs go?  I'll tell you more about all of that in a future post!  There's still lots to do!  Remember, this is a January project, so we're trying to space things out.  :)

What do you think of the paint transformation?  Do you have any tips for beginner painters like us?  Any painting horror stories?  I'd love to hear about them!  Just add a comment below.

Monday, January 6, 2014

Add Some Spice To Your Life

...Or at least your spice drawer.

When we moved to our new house, I opted to put all of the spices in a drawer by the stove.  It seems like a great idea since I like to grab random spices and throw them in the pot  while I'm cooking. 

The only negative?  I could never find what I was looking for!  If I laid the bottles down, they rolled around.  If I stood them up, I could see the label.

So I took to my favorite website ever - Pinterest!  I came across this post.

I started gathering supplies:
  • Calkboard Paint
  • Colored Chalk
  • Old Newspaper
  • Baby Food Jars - I got mine from someone on Facebook.  I just put out an "ISO" post.  I paid $0.10 each, so I got 30.
Let's get to work!

First I soaked the jars in hot, soapy water to loosen the labels.
 
Some of the labels slid right off.  A couple I had to use my Pampered Chef pan scraper to scrape some of the glue off.
After I got all the labels and glue off, everything went into the dishwasher.  The next step was the paint the lids of the jars.  Try not to paint the grass.  (Sorry Drew!)
 After that, it was just a matter of filling the jars with spices and labeling the tops.  Except, labeling didn't go quite as expected.
The colored chalk was scratching the paint off.  I tried a chalk pencil from my sewing kit, but you could barely see it.  Finally I tried a softer chalk from a 2000-something art kit that I'm pretty sure I got in middle school.  Alas, the chunky chalk was too chunky.  However, the chunky chalk was great for "conditioning" the chalkboard paint.  And by conditioning I mean swirly some chalk across the paint and rubbing it in.  I chose to wipe it off afterwards, but you could leave it.  Just depends on what you like!

So I broke down and bought this baby:


It's called a chalk marker and is the same thing they use on those signs at restaurants.  It was super easy to write with and left a neat text.

Now, back to the filling of the jars!
I laid out each of my spices beside and jar and began filling.  After I filled it, I labeled the top. 

Now my spice drawer looks like this:


Isn't it pretty?

So now that I've been living with it for a little while, what do I think?

I still love the look, but the lids don't screw on perfectly.  Maybe this is because I had two different brands and the jars were a little different?  I think I may replace my  baby food jars with new small jars from somewhere like Hobby Lobby.  If I get around to it, I'll let you know.

My other complaint is that the jars tend to slide around in the drawer. It's something I could probably solve by putting a grippy drawer liner in.

How do you store your spices?  Have you had any issues reusing baby food jars?  If you try out this project, I'd love to hear your results! 


January's Project: Man Cave

In an effort to make our house less "builder's basic" and  more our own, we've come up with a list of things we want to change about the house.  I've also come up with a time line for completing these tasks.  January's project is the makeover the man cave.

Our home is a 3 bedroom house.  Since it's just us, we're using one of the rooms as a guest room and the other as Drew's man cave.  Drew really enjoys playing video games, and I really hate watching him play them.  In our rental house, he played all his games in the living room.  This meant listening to shots ring out as he played Halo while I tried to do homework.  We knew that in our new house, we wanted to him to have a space were he could play.  

So back to the makeover.  Drew envisioned gray walls, a leather reclining loveseat (with cup holders), and an Ole Miss theme.  Here are the before pictures:


Pretty boring huh?  These are the problems with have with this space:
  • Those beige walls are bland and are all throughout our house.  I hate them.  
  • The tiny entertainment center doesn't hold all of the gaming systems and offer no storage. 
  • We're bursting at the seams with DVDs.  Last time I counted we had around 250.
  • One side of the room looks cramped, while the other side is empty.
  • The walls are empty.  They're in desperate need of some artwork/Ole Miss memorabilia.
  • We need storage for our computers.  (We have both personal and work laptops.)
  • We also need storage for various electrical cords and such.  
I think we have a pretty good idea on how we're going to approach the room.  I'll definitely keep you updated on the room as it progresses!

Does your family have a "man cave?"  How do you store video games and movies?  I'd love to hear your ideas!

Wednesday, January 1, 2014

Happy New Year's!

Happy New Year's, from our family to yours! We rung in 2014 by watching a couple episodes of Doctor Who and watching fireworks from our window.  The pups handled it pretty well, and Daphne loved the "kissing" part of the holiday.  (Aren't puppy kisses the best?!)

Just like everyone else, we've come up with a couple of goals for this year.

Here's my list:
  • lose weight - Isn't that on everyone's list??
  • run 1/2 marathon
  • study my Bible daily - I got the Chronological Life Application Study Bible last year and haven't made time to study it like I should.
  • keep a clean house - I've already made up a daily cleaning schedule.  You know I love lists and schedules!
  • read more - I love reading, but again, hardly make the time I should. 
  • watch less TV - This goes with the one above.  I find myself watching stuff that I really don't even care about.  Dance Moms marathons, anyone?
  • play piano again - I took piano lessons all growing up, but it became less of a priority when I started high school.  
  • learn to play guitar - I got Drew Rocksmith for Christmas.  It's kind of like a video game, but it teaches you to play.  I think it'll be fun!
  • scrapbook! - Again, one of those things that I just never make time for.  Mom bought me a Cricut for Christmas this year, so that should give me some motivation.
  • decorate the house - I'm determined to make our new home look less "builder basic."  I've come up with a schedule to tackle different areas of the house all throughout the year.
  • keep up the blog! - I don't know why, but I love the idea of writing a blog.  Whenever I read them, they just seem so fun.  This is the third (I know) time I've tried to do this, so here's to commitment in 2014!
Drew's list is a little shorter:
  • run a marathon - He's first 1/2 marathon was last December.  
  • get better at guitar - He's taking the Rocksmith 60 day challenge.  We'll let you know how it goes.
  • take up biking - He said running is getting a little mundane and taking up biking seems fun.
  • lose weight - Again, isn't this on everyone's list?

I even come up with some resolutions for the dogs:
  • no more accidents in the house
  • no more breaking out of the kennel
  • listen to what Mom and Dad say all the time

I think Dexter and Daphne might have the hardest time keeping their resolutions. :)

What are your resolutions for 2014?